 Save
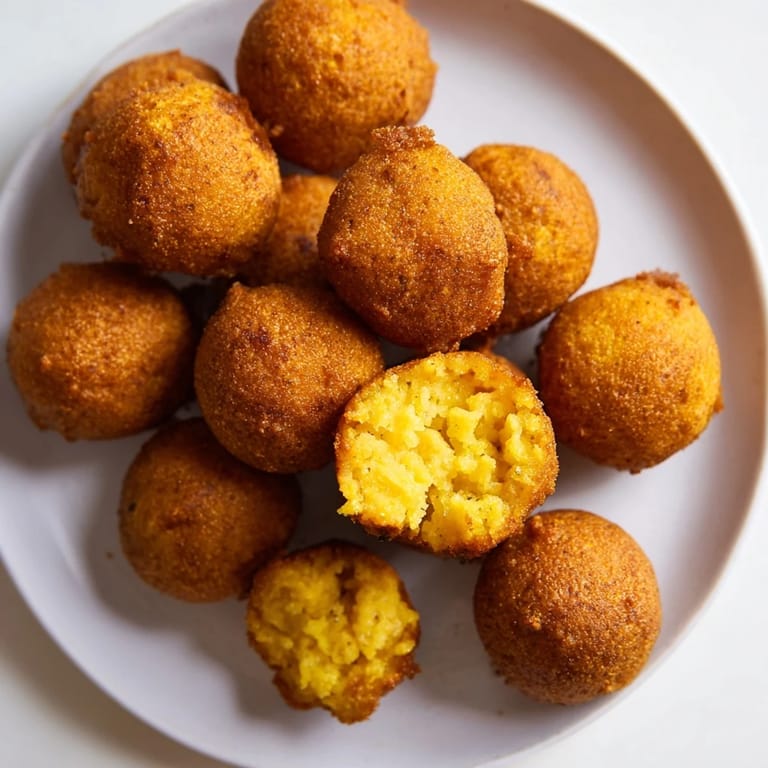
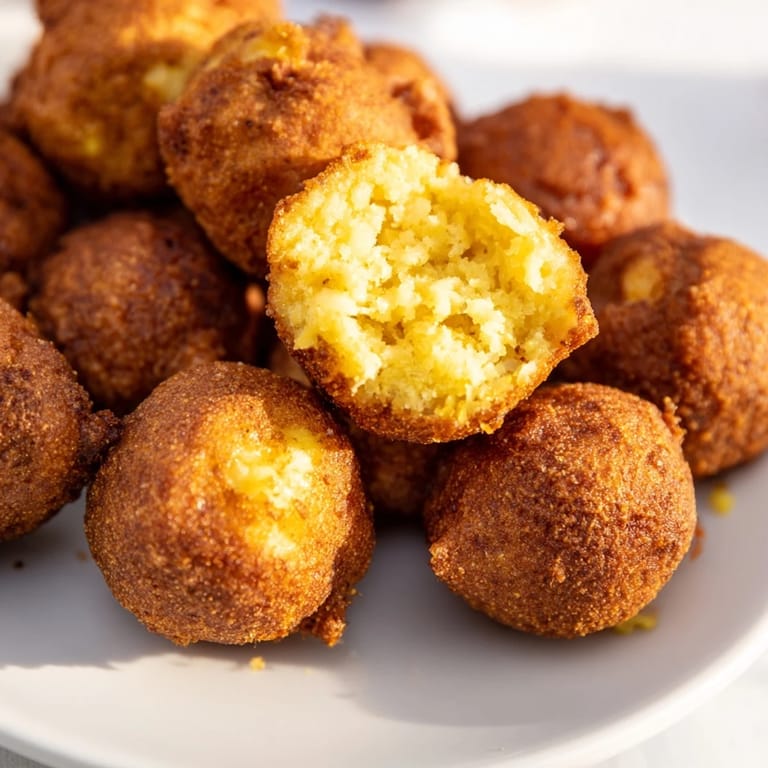
Save There's something about the smell of hushpuppies frying that instantly transports me to a humid summer evening on the Carolina coast. My grandmother stood at the stove, dropping spoonfuls of batter into a pot of shimmering oil with the kind of casual precision that only comes from doing something a thousand times before. The first batch emerged golden and impossibly crispy on the outside, steam escaping from their tender centers when I bit into one. That single moment—standing in her kitchen with hot hushpuppies cooling on paper towels—taught me why people get nostalgic about simple fried cornmeal.
I made these for the first time on a weeknight when I had three friends coming over unannounced, no plan, and about thirty minutes before they arrived. Hushpuppies seemed like the kind of food that would say "I wasn't expecting you but I'm genuinely happy you're here," without the stress of actual cooking anxiety. By the time they walked through the door, I had a mountain of golden balls cooling on the counter and a dipping sauce situation happening. One friend asked for the recipe before even sitting down, which felt like the highest compliment a hastily thrown-together appetizer could receive.
Ingredients
- Cornmeal (yellow, medium grind): The foundation that gives hushpuppies their distinctive texture and subtle sweetness; don't use polenta or the grind will feel too coarse.
- All-purpose flour: Just enough to hold everything together without making them dense or cake-like.
- Buttermilk: The acidity reacts with baking soda to create those perfect air pockets; regular milk won't give you the same lift.
- Baking powder and baking soda: Both work together to make them rise and stay light, not just one or the other.
- Diced onion: Yellow or sweet onions melt into the batter and add a subtle savory note that makes people ask what they're tasting.
- Fresh chives or scallions: Optional but genuinely recommended if you have them; they brighten the whole thing with a whisper of onion flavor.
- Vegetable oil for frying: Use something neutral with a high smoke point—peanut oil works beautifully if you're not avoiding it.
Tired of Takeout? 🥡
Get 10 meals you can make faster than delivery arrives. Seriously.
One email. No spam. Unsubscribe anytime.
Instructions
- Combine your dry ingredients:
- Whisk together cornmeal, flour, baking powder, baking soda, sugar, salt, pepper, and cayenne in a large bowl until everything is evenly distributed and there are no little pockets of baking soda hiding anywhere.
- Mix the wet base:
- In a separate bowl, whisk buttermilk and egg together until they're completely combined and the egg is fully incorporated.
- Bring them together gently:
- Pour the wet ingredients into the dry mixture and stir just until everything is moistened—the batter will be lumpy and rough, and that's exactly right; overmixing makes them tough instead of tender.
- Add your aromatics and let it rest:
- Fold in the diced onion and chives if you're using them, then set the batter aside for five minutes so the cornmeal can fully hydrate and the flavors can start to mingle.
- Heat your oil to the right temperature:
- Use a deep fryer or heavy-bottomed pot and bring the oil to 350°F (175°C); if it's too cool, they'll absorb oil and become greasy instead of crispy, and if it's too hot, the outside will brown before the inside cooks through.
- Fry in batches without crowding:
- Using two spoons or a small ice cream scoop, carefully lower heaping spoonfuls of batter into the oil, working in batches so the temperature stays consistent and each hushpuppy has room to cook evenly.
- Turn and fry until golden:
- After about a minute, start turning them gently so they brown evenly on all sides, continuing for another 1–2 minutes until they're a deep golden color and float naturally to the surface.
- Drain and serve immediately:
- Remove them with a slotted spoon and place on paper towels to drain any excess oil, then eat them while they're still warm and at their absolute crispiest.
 Save
Save I learned the real magic of hushpuppies the night I made them for someone who'd grown up eating them from a local spot near their childhood home. They closed their eyes after the first one, and when they opened them again they just said "exactly like I remember." There's something about nailing a recipe that connects to someone else's past—it stops being about technique and becomes about care.
The Secret to Crispy Exteriors
The crispiness isn't magic; it's about oil temperature consistency and not overcrowding the pot. When the oil is exactly right and you give each hushpuppy breathing room, the outside seals almost immediately, trapping steam inside and creating that shattering texture you're after. I used to fry eight or nine at a time thinking I was being efficient, and they'd all turn out slightly oily and less crispy. Now I fry four or five per batch, the temperature stays stable, and they come out absolutely perfect every time.
Flavor Variations That Actually Work
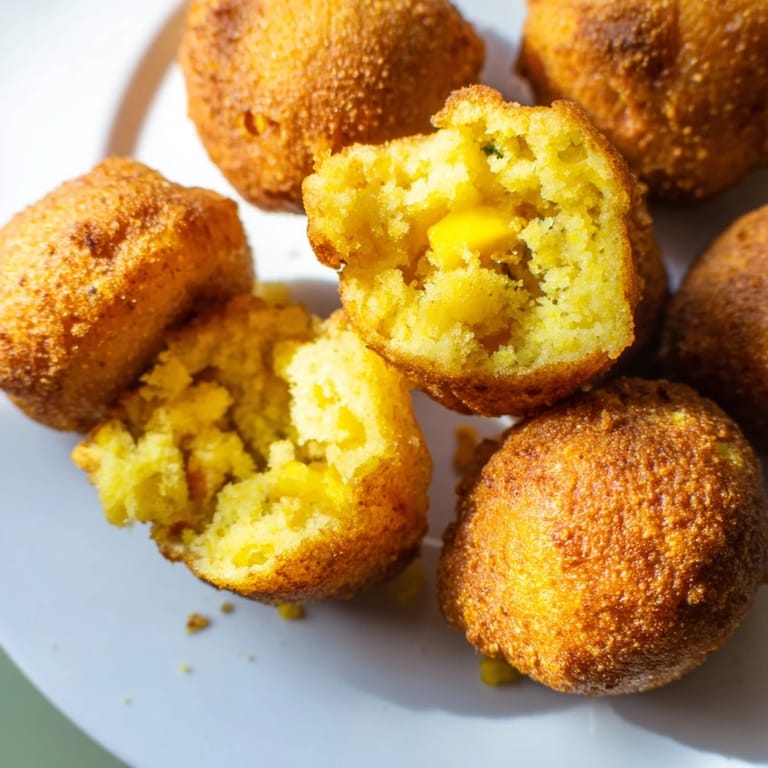
The basic hushpuppy is already delicious, but small additions can push them in different directions without changing the technique. A pinch of smoked paprika adds a whisper of depth, minced jalapeño brings heat and brightness, and a tablespoon of finely grated sharp cheddar makes them almost savory enough to eat for dinner instead of as a side. I've even tried adding a teaspoon of honey to the wet ingredients for a barely perceptible sweetness that somehow makes the savory flavors more pronounced—not dessert, just more interesting.
What to Serve Alongside
Hushpuppies are versatile enough to work with almost anything, but certain combinations feel inevitable. Tartar sauce is the classic pairing, honey butter transforms them into something almost indulgent, and a simple cocktail sauce brings a tangy kick that cuts through the richness beautifully. My favorite discovery was serving them with a chunky avocado crema—the coolness and creaminess balance the hot, crispy exterior in a way that makes them feel fancy enough for company but still utterly relaxed.
- Tartar sauce, hot sauce, or honey butter are the holy trinity of hushpuppy dips.
- They stay crispy for about ten minutes off the heat, so serve them immediately or reheat gently in a 300°F oven to restore the crispiness.
- Leftover batter keeps in the fridge for a day and actually fries better the next time because the cornmeal has fully hydrated overnight.
 Save
Save These are the kind of side dish that can unexpectedly become the star of dinner, the thing people remember more than the main course. Make them because they're easy, because they're genuinely delicious, and because there's something quietly joyful about serving something warm and crispy that you made with your own hands.
Recipe FAQs
- → What type of cornmeal is best for making these balls?
A medium grind yellow cornmeal works best to achieve the ideal texture—crispy outside and tender inside.
- → Can I substitute buttermilk in the batter?
Yes, you can replace buttermilk with regular milk mixed with 2 teaspoons of lemon juice for a similar tangy flavor and texture.
- → How do I know when the cornmeal balls are cooked properly?
Fry them until they turn a rich golden brown and crisp on the outside, about 2 to 3 minutes. Inside should be tender without being doughy.
- → What oil is recommended for frying?
Vegetable oil is ideal for deep-frying due to its neutral flavor and high smoke point, ensuring even cooking and crispiness.
- → Can I add extra spices for more flavor?
Yes, adding smoked paprika or minced jalapeño to the batter enhances the flavor profile without overpowering the classic taste.